Thursday, June 30, 2011

Scrapbook Ideas: Christmas Ornaments Made From Scrapbook Paper

This week I have been writing or focusing on other items or crafts that you can make using your scrapbooking supplies or scrapbook paper. You can also create unique Christmas ornaments from scrapbook paper in several different ways. Some ornaments are more complicated than others and may require more tools or supplies than just paper, but the for a little added effort the end results are sure worth it.
100_1018 (300x225)
Aren’t these just the cutest little hand-made ornaments you have ever seen? I couldn’t believe that these were actually made from paper when Mom first showed them to me, but they are. One looks like a traditional round ornament that you would find on a Christmas tree (done with tea bagging technique, but can be done just the same with scrapbook paper) in any home and the other looks like a little gingerbread or bird house, perfect for those who have a theme to their trees. These ornaments can be made for a tree anytime of the year. I know some crafters who have trees as dinning room center pieces that decorate them for every season or holiday throughout the year. These would be perfect ornaments to put on those trees and they don’t cost an arm and a leg nor do they take a lot of time to create. The Stampin’ Chic Blog has a very cute scrapbook paper ornament that is so simple you can get your children involved HERE. You will want to give these to all of your holiday party guests.

Here is a step by step tutorial showing you how to create those adorable little ornaments The Stampin’ Chic has on her blog provided by INKspired Creations. There is also another version of the globe ornament here from Reese Dixon’s blog and she also makes some really cute heart ornaments the same way.


Scrapbooking Ideas: Scrapbook Page Christmas Baskets

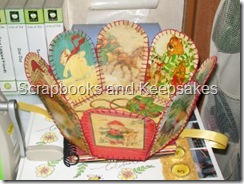
Chances are you’ve seen the baskets I’m talking about and think that only bored little old ladies create them, but that simply isn’t true. Most of the time these scrapbook page baskets are a way to repurpose and reuse greeting cards sent out at Christmas time. I always get tickled when Mom makes these little baskets cause they are very cute and great for organization, but I can’t help but think that people make these or reuse the cards so someone doesn’t get upset because you threw their greeting card in the trash or in a recycling bin. LOL!
You can easily make these baskets to work for anything theme using the same pattern and technique, but instead of using greeting cards just use the thick cardstock-like patterned scrapbook paper. Create these baskets to decorate for a birthday party with items you already have or a wedding and place party favors or candy for guests to grab on their way out as a thank you gift. Mom and I have made several of these for other people and she kept one for herself, here is a picture of one below.
100_1034 (300x225)
ITEMS NEEDED:
  • 14 Cards
  • Glue
  • Yarn and Needle
  • Awl
This is a list of items needed if you are creating a card basket, but can easily be adjusted if you are using scrapbook paper. The awl at the bottom of the list is to punch the holes into the thick cardstock. I’m sure you’re thinking…”why not use a hole punch?” Well the holes only need to be big enough for the thread to get through. Making Memories has a tool kit available that has smaller tools in one convenient place that you may use while you’re doing any type of paper crafts. This kit includes a setting tool, a hammer, an awl, needles, tweezers, pliers and a setting mat all in a small compact case. The great thing about this kit is that the tools are not cheaply made, it’s easy to store in any craft bag or sit on a desk and the tools all have their own place in the case.

Echo Park paper company has two of the most adorable paper for those readers who would love to make these for Christmas. The picture here is of my favorite collection by Echo Park, Everybody Loves Christmas that will be sure to warm your heart and the receiver of this wonderful gift.

All Free Crafts has an article dedicated to creating this card basket and also a free template you can download and print can be found at their site.
So go ahead and make your own basket and get to scrappin’ those scrapbooks and keepsakes!

Scrapbooking Ideas: Scrapbook Page Gift Boxes

There are so many more crafts and creations you can make using scrapbook paper. Scrapbook paper comes in almost any theme, print, shape or size and is useful to use when creating other objects, such as greeting cards, baskets and ornaments. Gift boxes made from paper are useful if you don’t have time to run to a store to purchase gift wrap for a gift that you need to wrap quickly. Instead, just grab a few sheets of patterned scrapbook paper, fold it a couple of times and place a small gift inside the box. These scrapbook page gift boxes are really fun to make and are a great accessory to a homemade gift.
100_1019 (300x225)
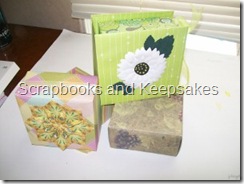
Here are a couple of scrapbook paper boxes mom and I have created as an example of how professional and extremely cute these little gift boxes can be. They may not cost much, but that doesn’t mean they look cheap when they are finished. The two on the bottom of the picture are done with only scrapbook paper, but the one on the top is done using a few more materials. The green box on the top, for a different look and little dimension is made with chip board. The top and the bottom square is a small piece of chipboard glued to the top and the bottom of the paper gift box. This creates not only a sturdier box, but a prettier more eye catching box as well.

There are many different ways to fold paper and create boxes, but the most basic folds for a simple box can be found HERE at the Homemade Gifts Made Easy website. I could explain step by step how to make these step by step, but her website has readable instructions as well as videos so you don’t miss out on anything. This website has everything you need to create beautiful gift boxes using paper. The Best of Brenda Walton scrapbook paper by K&Company offers a beautiful collection of papers to make beautiful gift boxes with for any occasion.

For another look at what other scrapbook-aholic individuals are creating try looking at Bonnie McLain’s blog Teaching Others to Play for a look at some of the boxes she’s created. These boxes are beautiful and she uses embellishments such as handmade paper flowers and ribbon to turn a paper box into an eye-catching creation.
So get to scrappin’ those scrapbooks and keepsakes!

Wednesday, June 29, 2011

Scrapbook Page Layout Tips For Beginners

When I was first starting to get the scrapbook bug I was so overwhelmed with the amount of projects available that I often had a hard time focusing my time and energy. I would start four or five different pages,  but finish none of them. When putting together a scrapbook page or set of pages as a beginner there are a few tried and true pointers to help you stay on track. Here are a list of tips to help you make the most of your time and create beautiful scrapbook page layouts when you are first starting out as a scrapbook-aholic.

  1. Organization
  2. Acid Free and Lignin Free
  3. Shop Simple
Organization-Scrapbook Case Chest with Organizer Top (White frame with clear cases) (25" H x 15.87" W x 14.25" D)
Organization will help you make the most of your time when you are creating a new scrapbook page or continuing an old layout. Everything, let me say that again....EVERYTHING should be organized: photographs, embellishments and tools so you always know where things are when you need them.

Acid Free and Lignin Free-Pioneer Acid-Free Glue Stick Pen
Any products you use on your pictures such as stickers, pens and glue adhesives should be acid free. These acid free products prevent damage to your photographs and don't cause them to brown or yellow with age in a scrapbook.

Shop Simple-
Only buy the basics when you are first beginning a scrapbook...there's no need to go overboard. As you get more comfortable with the idea and concept of scrapbooking then gradually add more tools and supplies to your collection. For a list of the supplies every scrapbooker should have when they begin check out that article

Tuesday, June 21, 2011

Scrapbook Pages: Goodies for Summertime Fun!

With children out for the summer, holiday celebrations and family vacations to be planned; there will be tons of great pictures you will want to place in your scrapbook album. The good news for you is that some of the best scrapbook companies offer some of the most beautiful scrapbook collections that pertain to summer fun at the beach, visiting the zoo and of course 4th of July. Here are current scrapbook page collections from the biggest scrapbooking companies so you can make your favorite summertime memories look their best.

Vacation Collections:
Vroom 12X12 Wander Collection Paper (Basic Grey) 
Basic Grey: Wander Collection – If you’re familiar with the Basic Grey company and collections, then you know their backgrounds tend to be a little more eclectic than the collections featured by other companies. The wander collection covers several big travel destinations and also features traditional travel pages with roads, maps and road signs you may see on your trip.

K&Company Around The World Flat Paper 12"X12" Sea Cruise; 25 Items/Order
K and Company: Brenda Walton Designs Around the World – Extremely adorable collection and a must have for anyone that will be putting together a scrapbook of summer vacations. The great thing about this collection, as with anything K and Company puts out, is the fact that they have journal tags, post cards, die cuts and other embellishments available that correspond with this collection.

Beach Collections:
Beach Bag 12X12 Barefoot & Bliss Collection Paper (Bo Bunny) 
Bo Bunny: Barefoot and Bliss – If you are looking for a page perfect for a boy, girl or family scrapbook layout this is a great choice for a beach page. Bo Bunny incorporates Hawaiian flowers, waves and of course the colors blue, yellow and orange. This is by far my favorite collection for a beach theme because I can use this collection to showcase pictures for any gender and the fun summer colors on each page are perfect for at the beach pictures.

Zoo and Animal Collections:
Actopus To Zelephant Double-Sided Specialty Paper Pad 12x12"-28 Sheets 
K and Company: Actopus to Zelephant – This is the most adorable zoo or animal collection I have ever seen in my entire life and can easily be used for more than just zoo pages. This collection has a child like theme to it, but will be a favorite among both young and old scrapbookers or any gender. The scrapbook pages are too cute to pass up and the clear acrylic letter stamps that were made for this collection are very unique. Each letter is illustrated in some way to represent an animal. For example, the letter “S” is bent to look like a seahorse and “B” looks like a bear. Here are the stamps Actopus To Zelephant Stamps-Alphabet
Stripe 12X12 Zoology Collection Paper (Bo Bunny)
Bo Bunny: Zoology – This collection is for more mature pictures and comes in every single animal print you can possibly think of: tiger, zebra, giraffe and I think they have a tortoise shell printed paper. This collection is a little dark for Bo Bunny and isn’t one of my favorites, but can be used for the scrapbooking individuals that aren’t big on the cutesy scrapbook collections done by other companies.

Independence Day Collections:

K and Company: Americana and All – This collection will make your favorite 4th of July celebrations and pictures more beautiful than they were before. The nostalgic feel to these scrapbook pages and the beautiful red, white and blue hues will have you wishing that everyday was 4th of July.
Liberty Collection Collection Pack (Bo Bunny)
Bo Bunny: Liberty – A little brighter than the collection released by K and Company, but I can’t say which is better because they both offer things I like and dislike. Check out this collection as another option to use for your July holiday photos and scrapbook albums.

Friday, June 17, 2011

K and Company SMASH BOOK Review

If you haven’t heard about the SMASH book yet after you read this review or post about the new K and Company scrapbooking on the go product you are definitely going to want one. I am extremely excited about it! The SMASH book was released at the end of May and is available for order at the K & Company Website.

Mod Black Smash Folio

The smash book is like an altered book slightly smaller than a piece of paper at 7.75” wide and 10.25” high. This product is great for those of us that do not have time to create an altered book, but want one. Place smaller miscellaneous memories in one place and organize your thought in this cute little journal.
Things to Feature in the SMASH Book:
  1. Things you love
  2. Things you hate
  3. Big ideas
  4. Art work and small doodles
  5. Diary or journal entries
These are just a few things you can place inside your SMASH book in order to get your creative juices flowing.

The SMASH book comes in four different colors: black, blue, pink and red for the men and women that love to scrapbook on the go, but don’t have time to do it. There is also a line of products K and Company has released, specifically designed embellishments that go with the SMASH book itself to quickly decorate the book. These embellishments have the word SMASH in the product line to let you know they are for the SMASH book series, but could easily be used for other craft purposes. The products are made smaller than most scrapbooking embellishments since the pages for this book are not as big as a standard 12xx12” scrapbook page.

SMASH BOOK PRODUCTS:
  1. Date Stamps
  2. Pockets
  3. Note Pad Pages
  4. Stickers
  5. Clips
  6. Page Tabs
  7. Bookmarks
  8. Tape
  9. Bands
Throw the SMASH book in your pocket book and scrap on the go with the new line of products from K and Company. For those that want to create their own version of the SMASH book, keep an eye out for later on this week. I will be posting a sneak peek look at the smash book that I am creating or altered book I’m creating. I plan on buying the regular smash book when it is available in store, but for right now I’d like to create my own.

Now get to scrappin’ those scrapbooks and keepsakes and stay tuned for more creative ideas.

Scrapbook Layouts: Halloween Challenge Page

This is Mom’s challenge page and she was so excited about this scrapbook page, not to mention it turned out fantastic. Mom’s Halloween scrapbook page layout came together very quickly, which is unusual for her. She says doing these challenges helps her focus in one area instead of trying to decide what to work on, the challenge makes that call for you. Mom incorporated all of her elements into the page that she drew and the paisley pattern she blended in nicely with the page by cutting out paisley birds with a FISKARS PAISLEY PAPER PUNCH and using paisley printed paper from K & Company. To read more about what Mom needed to place on her scrapbook page to complete her challenge you can read the challenge post Here.

100_0993 (300x225)

ITEMS NEEDED:
 Fiskars 1298937797 Fiskars 12" Personal Paper Trimmer, 10-Sheet Capacity, 12" Cut Length
K and Company Striped Paper
K and Company Halloween Embellishments
Fiskars Paisley Paper Punch
Paisley Paper

HOW IT WAS MADE:

Mom is out of town right now, so I will post more on how she made this page when she gets home this weekend. We usually make notes to organize and list products that we use and how we make a page, but I can’t find the list Mom made on her messy desk.
Check out scrapbook page layout I created for this challenge HERE using the birthday theme, pink and plaid. It actually turned out really nice. Remember to post a link to your challenge page if you created one using what Mom drew out of her basket and let us know what you think about it in the comments section.
Now get to scrappin’ those scrapbooks and keepsakes!

Scrapbook Layouts: Birthday Girl Scrapbook Page

First off before I show the picture of the scrapbook pages Mom and I have made this week I want to apologize to everyone that has visited the blog this week looking for our challenge scrapbook pages. Mom and I missed a whole week of work because my computer’s motherboard and battery went out. The technician should have been here to fix my computer the next day, but instead it took almost a week to get my parts in. By the time I got my computer fixed I had to make up for lost time at work. I need my computer for our scrapbook blog as well as my work, so I was way behind. Without further ado, here is my challenge that should have been posted last week. If you don’t remember the challenge check out the blog post HERE.

100_0992 (300x225)

I must admit this page was an absolute nightmare for me to finish. I tried three different layouts with different scrapbook papers and page layouts before I finally decided on this page. My problem wasn’t incorporating the themes which were birthday and playtime because I had the perfect pictures to incorporate both, but with the plaid theme that I choose. I had to incorporate pink and plaid… I was excited about the color pink (it’s my favorite color), but I wasn’t excited about incorporating plaid into my scrapbook page layout…..I HATE plaid and I couldn’t get a layout to look right with plaid. When I finally put this page together, which was very simple, I was very happy with it! Sometimes less is more with a scrapbook page.


Items Needed:

 Fiskars 1298937797 Fiskars 12" Personal Paper Trimmer, 10-Sheet Capacity, 12" Cut Length
Cre8-a-Page 8.5x11 Fluorescent/Neon Cardstock Multi-Color Pack, 25 Sheets, 5 Colors Card Stock
Cricut Cartridge, Paper Lace

I didn’t really use any particular items for this birthday girl scrapbook page because it’s mainly hot pink and neon green cardstock and a generic pink plaid paper from Michaels that I picked up a couple of months ago when they had their paper on sale. For more about saving money at Michaels and A.C. Moore check out my previous post about looking for coupons in the Sunday paper Here.

The only popular product that I did use for the main embellishments on this page was the CRICUT PAPER LACE CARTRIDGE. I used the Paper Lace cartridge for the title and the pink and white flower cut out on the bottom-right corner of the scrapbook pages main photograph.

HOW IT WAS MADE:

I started off with a 12x12 plain white background. On the white background I cut a piece of 12x12 pink plaid scrapbook paper down to fit 3/4 of the page, but left the white background peeking around the edges about a quarter of an inch to add a little dimension and bring out the white in the plaid and white lettering I added later. I cut a two inch strip of hot pink cardstock and glued it to the left side of the page and covered the seam with a piece of two inch neon green cardstock overlapping the hot pink and plaid paper.
I printed these photos from a computer program and with my printer, so that I could adjust the size of my pictures to perfectly fit the layout. The small pictures were glued to the green strip, creating a movie reel look, and were according to my photo editing program “thumb print” size. I covered the edges of the photos and green paper to make them look as if they were connected to one another with neon green ribbon that has a white stitched edge down each side.
The last things I added were the embellishments made with the PAPER LACE CRICUT CARTRIDGE. I cut the individual letters out at 1 or 1 1/2” I can’t remember which. For some reason I can’t get the setting right to make capital letters on this cartridge, so if anyone can give me a heads up let me know in the comments section. I tried every setting for every letter and couldn’t get it to work so that’s why the letters for the “Birthday Girl” titled scrapbook page are all lower-cased. The flower was cut out in pink at 3” and 2 1/2” in white cardstock. The flower is on page 36 of the PAPER LACE instruction manual and the buttons that should be pressed on your CRICUT MACHINE are “Flower 7” followed by the “Base Shadow” button on the left side of the key pad. I then placed a green number two sticker in the center of the flower cut out to symbolize how old my little girl was in this picture.
Leave your comments on what you think of the layout. I think it turned out great! Don’t forget to add a link to your challenge if you made one for this challenge too. Feel free to give us any pointers, what you would’ve added or how much you like it.
Now get to scrappin’ those scrapbooks and keepsakes.

Friday, June 3, 2011

New Scrapbook Challenge

If you haven’t been following our blog, recently Mom and I decided to do our own challenge every week. We draw strips of paper from a bowl with different theme, colors and tools we have to incorporate into our scrapbook layout. To read more about our first challenge and how we came up with the idea read more here. You can also view our previous scrapbook challenge from last week here Beach Theme or Grandkids Theme.

100_0986 (300x225)
This week Mom and I dumped all the categories into one basket. So the color, theme, embellishments and tools are all together. We both picked out five different strips of paper from the basket and the picture above is what we have to do a scrapbook page on for next Friday.

VIEW THE FINISHED CHALLENGE PAGES HERE: Mom's Halloween Page and My Birthday Page.


Mom:

  • Paisley
  • Glitter
  • Kids
  • Halloween
  • Stripes
Me:
  • Playtime
  • Birthday
  • Bo Bunny
  • Pink
  • Plaid
I’m very excited to see how Mom incorporates paisley with Halloween because we have to use all five categories in our scrapbook page layouts. I have to incorporate two themes, but thank God I didn’t draw two random themes. It will be a challenge to put this page together with the embellishments and tools, but not with the themes because there is always playtime at a birthday party.
Come back next Friday to see the pages Mom and I make for this challenge and don’t forget to join in. Now, get to scrappin’ those scrapbooks and keepsakes.
Scrapbook Page Challenge: Creative Grandkids Scrapbook Layout

100_0982 (300x225)
My scrapbook page theme for this week’s challenge had to do with grandkids. I also had to incorporate three out of four other choices that included: the colors orange and yellow, Sizzix die cuts and Martha Stewart products. To read more about how we came up with this challenge read more here.

This challenge, believe it or not, was actually a challenge for me. It wasn’t difficult because of the items I had to incorporate different elements into the page, but because I had to follow rules for what I used. I like to think outside the box and the fact that I had guidelines to follow made it challenging. You can also view Mom’s challenge scrapbook layout for her beach theme here.

Items Needed:
  1.  Making Memories Black Gingham Paper
  2. Bo Bunny 12x12 Specialty Paper-Sunflower Fun 
  3. Sizzix 655268 Big Shot Cutting-and-Embossing Roller-Style Machine 
  4. Sizzix Picket Fence Die Cut
  5. Making Memories Ledger Paper
  6. Bo Bunny Cardstock Stickers - Grandparents
  7. Fiskars 9698 Euro 12-Inch Portable Paper Trimmer


How I Created This Page:

The background of the page is a splice between two different patterned pages. The sunflower background is by Bo Bunny called Tuscany Garden and the black and white piece is Black Gingham by Making Memories. The yellow background for the pictures is a piece of 8 1/2” mustard colored piece of cardstock trimmed down slightly using a Fiskars Paper Cutter. The journal section in the lower right-hand corner of the page is a piece I cut out from a 12x12” scrapbook page by Making Memories called Ledger Combo. This page features several different ledgers on a background that you can keep as one background or cut each one out individually to use on several pages.

The white picket fence at the bottom edge of the page is a Sizzix die cut called Picket Fence. There are four stickers used on the page, three that look like bullets on the left of the top picture and one large sticker with a quote about grandparents. I used these stickers to incorporate the orange color on my page. The stickers are embellished in the center with random buttons. The stickers are Grandparent stickers made by Bo Bunny.
Please keep up with our challenges by visiting every Friday and don’t forget to join in. Now get to scrappin’ those scrapbooks and keepsakes!

Scrapbook Page Challenge: Creative Beach Scrapbook Page

100_0984 (300x225)
This week was not only a challenge week for our blog, but was also a challenging week in general to get everything accomplished that needed to be done. If you don’t remember, last week Mom and I decided to keep things creative with our scrapbooking concepts by making our own challenge. We were to create a scrapbook page layout based on the contents listed on various strips of paper. To read more about how we came up with our challenge and what we did you can read about that here.

Mom’s scrapbook challenge was to create a beach themed scrapbook page using Stampin’ Up products, the colors red and pink, and rhinestones as an embellishment. Mom was nervous, but excited about the challenge, however; her finished scrapbook page layout not only turned out great, but also included all five elements instead of just four. Keep reading further for the items used in this page and how it was put together.

Items Needed:
  1.  Stampin' Up Stamps: Crayon Kids
  2. Manga Skin Kit - Copic Ciao Set (8 Marker + 1 Multiliner Pen)
  3. Scenic Route Paper - Garland Scrap Strip
  4. Wausau Creative Collection Classics Specialty Cardstock Starter Kit, 8.5 X 11 Inches, 72 Count (46407) 
  5. Tsukineko Brilliance Full-Size Pad, Starlite Black


How Mom Created This Scrapbook Layout:

This page actually features three different layered backgrounds. The first background page is a piece of 12x12 cardstock in red. On top of the red cardstock to create the second layer mom used a piece of pink cardstock, slightly trimmed, and placed it over the red cardstock. This gives a dimensional or framed look to the scrapbook page. The final layer, which is placed on top of the pink cardstock, is a patterned paper by Scenic Route Paper called Garland Scrap Strip. This patterned paper is actually a Christmas or holiday background page that mom utilized for a different purpose and features the colors pink and red in several different patterns.

Mom didn’t do any special cropping to the pictures for this scrapbook page, she kept them at a regular 4x6” size, but they are placed on pink card stock to frame the pictures. The children and sun images is a stamp set called crayon kids by the Stampin' Up Company. Mom stamped the image directly onto the finished scrapbook page. She stamped each image using black brilliance ink, where she wanted them on the page. She then stamped the image again on a piece of white cardstock and colored them in using copic markers. She cut out the face and the clothes of the children and glued them directly onto the scrapbook page where the images were previously stamped. Adding the cardstock images on top of the flat stamped image create a 3D effect on the page.

Mom used pink rhinestones at the bottom left-hand corner of the page to separate the words SPARKLE. It’s very hard to see in the picture, but they are there.
We also drew our strips of paper for next weeks challenge, so stayed tuned for that later on today. Please feel free to submit any challenges you participate in and leave a link to your image or blog.
Now get to scrappin’ those scrapbooks and keepsakes!

Popular Posts